Photoshop Frame Animation
Animated Card
Your goal is to complete and post 4 animated gifs.
The first will have 1 required style of animation.
The second will have 2 required animations. You may duplicate the style of the first but the second must be different.
The third will have 3 required animations.
The fourth = four required.
always: add your name (blog address) and Title
4 cards: Winter - Spring- Summer - Autumn
The following tutorial is for Winter.
http://www.brighthub.com/multimedia/publishing/articles/95252.aspx
the updated version of the above link:
the updated version of the above link:
· 900 x900 pixel with a Transparent background
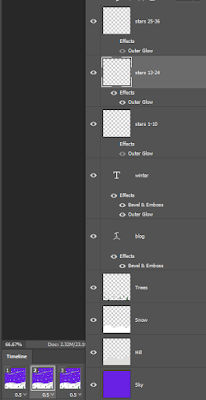
· Choose a dark colour and paint layer 1 then rename it “sky”
· Create a new layer – rename it “snow”
· Choose colour white and with the paint brush size “8” draw the top of the low sloping hills across the lower 1/4 of the sky layer – then paint below this line.
· Create a new layer – rename it “hill”
· Choose a darker white colour and with the paint brush draw a hill in the middle but not much higher than the snow. Draw from the bottom left side to the bottom right so you can paint below again
· Drag the “hill” layer below the “snow” layer
· Click on the snow layer, then create a new layer– rename it “trees”
· Choose a darker green colour – with the paint brush draw a very large conifer tree – if you draw an outline make sure you paint it.
· CTRL click on the thumbnail of the tree on the trees layer. The tree should highlight. Choose CTRL-T then shrink the tree to a reasonable size.
· COPY and PLACE 25 trees of various sizes. While the tree is highlighted and the MOVE tool is selected press ALT and drag/copy a new tree and place it on the snow. Trees in the distance tend be smaller. Use CTRL-T to shrink the tree size. It may be wise to ZOOM in. CTRL-E will merge the new layer.
· NOTE: To highlight a tree afterwards use the “MARQUEE” tool and move it with the “MOVE” tool. To UNHIGHLIGHT press CTRL-D
· Create a new layer – rename it “blog”
· Choose the TYPE tool – choose type size around 60pt and a nice bright colour. Type in your blog address
· Choose from the menu above – Type-Warp text-then choose a style.
· Choose from the menu above- Layer- layer style- Bevel and Emboss – change size to 5. Click OK.
· Choose the TYPE tool - then vertical type tool- type "winter" and place in the lower right corner
· Create a new layer – rename it “stars 1-12”
· Draw 12 stars a pale cream colour – draw 1 size and CLONE stamp it 4 times – then a second size and a third
· When using the clone stamp – make its size large enough to cover the star then press the ALT key and click then stamp
· Create a new layer – rename it “stars 13-24” – 12 more stars - draw a new star
· Create a new layer – rename it “stars 25-36” – 12 more stars
· Follow the tutorial under “Making the Stars Twinkle” –try changing the gradient when in OUTER GLOW to a different colour· When it comes to ANIMATION go to Window-TIMELINE then switch to ‘create frame animation’ then click on ‘Create Frame Animation’
· With ‘stars1-12’ layer highlighted click on the ‘duplicate selected frames’ button in the timeline window. Continue following the tutorial.
1st frame -hide effects in other 2 layers
2nd frame -hide the effects in 1st and 3rd layers
3rd frame -hide the effects in 1st and 2nd layers
· Make sure you choose “forever” in the timeline window.
| Note the highlighted Frame and Corresponding Layers | ||
|---|---|---|
· Make sure you choose “forever” in the timeline window.
play with the delay timing numbers
· File -export -Save for Web(legacy) – choose GIF make sure it runs forever - save your image
Post a screen shot of your LAYERS as well - make sure your have named them accordingly
Post a screen shot of your LAYERS as well - make sure your have named them accordingly
The FOUR animations:
Winter - snowy hill with trees and twinkling stars
Spring - A flower bed with growing tulips and flowing clouds
Summer - a beach with seagulls in the sky and crabs on the sand plus something else
Autumn - Deciduous trees with falling leaves, moving sun, rain, plus something else
Spring - A flower bed with growing tulips and flowing clouds
Summer - a beach with seagulls in the sky and crabs on the sand plus something else
Autumn - Deciduous trees with falling leaves, moving sun, rain, plus something else


